Automatic Mode
The automatic mode of OpihiExarata is its atmospheric monitoring mode. It is best operated by its dedicated graphical user interface.
Images, continuously taken by the Opihi telescope and camera, are photometrically solved such that their zero points are calculated. The program does this automatically after the initial specifications and trigger.
We present the procedure for operating OpihiExarata in its automatic mode; please also reference the GUI figure provided for reference. We also summarize the procedure and process of the automatic mode via a flowchart.
Graphical User Interface
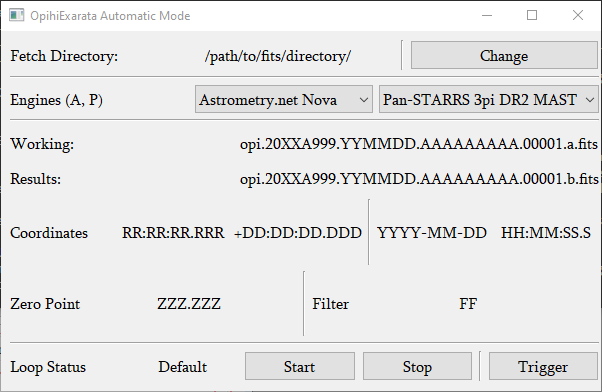
Fig. 10 The GUI of the automatic mode of OpihiExarata. This is what you see when the interface is freshly loaded. Most of the text is filler text, they will change as the program is executed.
The graphical user interface of the automatic mode of OpihiExarata, see Fig. 10. More information is detailed in the respective subsections of this section.
Procedure

Fig. 11 A flowchart summary of the procedure of the automatic mode. It includes the actions of the user along with the program’s flow afterwards.
We describe the procedure to configuring and starting and stopping the automatic mode of OpihiExarata. See Fig. 11 for a flowchart summary of this procedure.
Start and Open GUI
You will want to open the OpihiExarata automatic mode GUI, typically via the command-line interface with:
opihiexarata automatic --config=config.yaml --secret=secrets.yaml
Please replace the configuration file names with the correct path to your configuration and secrets file; see Configuration for more information.
Specify Data Directory
You will need to specify the data directory that the OpihiExarata program will pull from the most recent images Opihi has taken. This should be the same directory where the Opihi camera is saving the images it is taking constantly.
You can specify this directory by clicking the Change button to bring up a directory selection dialog. The exact form of the dialog is operating system dependent as we defer to their implementation. Select the directory using that dialog.
Once submitted, the Fetch Directory entry should change to match your selection. This display uses absolute paths; ensure that it is correct.
Specify Solving Engines
You will need to specify the solving engines that OpihiExarata will use to in order to solve the images. For this mode, only the AstrometryEngine(s) and PhotometryEngine(s) are considered as it does not use any other engines. The selected engines will constantly be used until a different one is specified.
Specify the desired AstrometryEngine using the left drop-down combo box. Specify the desired PhotometryEngine using the right drop-down combo box. The Engines (A, P) label has also small key to tell you which is which. For more information on the available engines, see Services and Engines
Trigger Continuous Images
You will need to trigger the Opihi camera to continuously take images. Please consult the Opihi camera controller documentation for more information.
(A little supporting information about operating the camera controller will be posted here when more information is available.)
Ensure that the directory that these continuous images are being saved to is the same directory you specified for this program to fetch from.
Trigger Automatic Solving
You will need to start automatic solving by triggering it via the Start button. Once it starts, it will do the following, in order, automatically, without the need for user intervention:
It will fetch the most recent fits image as determined by the modification timestamp of all fits files within the specified directory as provided by the operating system.
It will pre-process the fetched image according to the preprocessing algorithm, see OpihiPreprocessSolution.
It will solve for the astrometric solution of the pre-processed image via the specified AstrometryEngine. The results of the solution will be displayed in the GUI.
It will solve for the photometric solution of the pre-processed image via the specified PhotometryEngine. The results of the solution will be displayed in the GUI.
It will add this result (the filter zero point measurement) to the archive of observations. The monitoring webpage uses this archive to derive its figures.
The results from the pre-processing of the raw image and the subsequent engine solves will be saved to disk under a similar name to the original raw file and in the data directory specified.
It will repeat this process until stopped.
Trigger Once Manually
You may also trigger the automatic solving procedure manually once via the Trigger button. This will do the entire process as elaborated above, except for repeating it.
Displayed Status and Results
As each image is solved, the results of the solve will be displayed. We describe the fields which change as the automatic solving runs.
The Working field details the file that is currently being (or was last) worked on by the automatic solving procedure. The Results field details the file that has already been worked on and that has been solved without failure. When the working file, undergoing the solving, is solved successfully, it becomes a file with results and the program designates it as such. If the working file failed to solve, it is not transferred over.
The astrometric and photometric results of the Results file is displayed as well.
The Coordinates felids specify the on-sky right ascension and declination of the center of the image along with the UTC time of when this image was taken.
The Zero Point value, calculated via the photometric solver, of the image is provided along with the Filter that the image was taken in specified in said field. (The filter term is based on the fits header metadata.)
The status of the automatic solving will be displayed under Loop Status. The possible statuses, and their meanings, are:
Running: The automatic loop of fetching and solving images is currently running.
Stopped: The automatic loop of fetching and solving images is stopped.
Triggered: The solving of a single image has been triggered and it is being worked on.
Failed: An image in the automatic loop failed to solve, but this does not stop the loop.
Halted: The loop has been stopped via an alternative method than the Stop button.
Default: This is filler text when the GUI is first opened. This should not reappear throughout usage.
Stop Automatic Solving
When you want to stop the automatic solving, you can click the Stop button at any time. This will finish the current image it is working on and stop the automatic loop from fetching another image from the data directory. Because of the nature of sending information to external services (i.e. the backends to the engines), the solving of an image cannot be gracefully stopped mid-way and so the process must finish and we only prevent it from repeating.
If you want to stop the solving immediately for whatever reason, it is suggested to cancel or crash the process that OpihiExarata is running on.
The Stop button will not prevent a manual trigger from being executed via the Trigger button.
If the infinite automatic loop continues fetching images even after the stop button is pressed, this likely means something was changed in the code and the original logic failed. A solution to stop the loop is detailed in Automatic Mode Stop Button Not Working.